Monday, April 24, 2023

Figure Drawing

 Here are some of my personal figure drawings from this semester:


Some of these are physical, some are done in Procreate on the iPad. I will update this page with more of my work, but I do not have access to my class sketchbook at the moment, as I am out of town as of writing this. 

Monday, April 10, 2023

Artist Statement


Nature is something I have always admired, something that always helped keep my work rooted. My role as an artist is to capture the nature of the world, the ebbs and flows of living creatures, and present it in an animated format. Animation is my medium of choice, since it allows me to entangle myself in nature, teaching myself how to make birds fly and wolves howl. Being an animator gives me the tools and tricks I need to help recreate our incredible world on a 1920 x 1080p screen.

My primary role as an animator is to capture the magic and mysticism of our world, showing modern audiences just how incredible it really is. I want viewers to feel the chill of a windy day or the slick wet of monsoon season when they step into my animated worlds.

While a lot of modern art and animation focuses on human elements, I enjoy focusing on the inhuman. There is magic in making something move, especially if that something is not usually portrayed in modern work. This is why I tend to focus on animal fantasy and natural elements in my work, as I want my audience to be captivated by the nature I am portraying.

Ultimately, I don't know what my audience is going to come away from my work thinking-- and that's the beauty of it! Like nature, I hope my work is able to impact people around the world, regardless of background or creed. I want the animations I create to bring people the child-like joy I experience when finding a waterfall at the end of a mountain trail or a never-before-seen mountain vista. My greatest joy would be to reconnect someone with the natural world through my animated work, providing them with the tools they need to answer their own call of the wild.


Thursday, March 9, 2023

Animation Industry Review - Take 3

 Third time's a charm! Here's my third industry review! 

Not much to say-- I hope you like it! 


Sunday, February 19, 2023

Animation! Exaggeration Assignment!

 Promised I would be back with some animations, so here is me keeping that promise! 

I've been busy with a multitude of Mocap projects, so I'm happy I got the time at all to do some KEYFRAME ANIMATIONS! I have been cracking at this project for the past month and a half and I'm really happy with how far it came. I started with just some poses and then brought it all together into an animation. 

So, I figured that an awesome place to start for my first animation assignment of this semester would be one of my favorite childhood movies-- Air Bud! I used to watch these movies all the time. I rented them from Blockbuster with my parents and brother. I am really dating myself by bringing up this information, but I LOVE Air Bud! 

Since I had a lot to work on with my quadruped animations from last semester, I really wanted to challenge myself and work with a quadruped character, so Air Bud it was! 

I chose this clip from the movie, just a little section of Buddy shooting a basket! 

I also used this other video as reference, as the Air Bud scene shows a lot of camera cuts and front views. Those are helpful, but I really needed to get the poses right for this dynamic animation.


My main goal with this animation was not quantity (or number of seconds), it was just getting the action right at all. I did a lot of behind the scenes studying of animal motion, particularly in dogs. I also studied a lot of Maya books regarding the Graph Editor and tangents. I'm still getting the hang of it! 

I also worked a lot with the Motion Trail feature this time, which really helped out with the ball! 


I'm going to drop a few of my iterations for this animation below! Let me know what you think! This was a big endeavor for me, but I'm really happy I was able to push through it. 


I feel like I'm getting "used" to 3D animation now. I'm not perfect at it, but I'm really trying my best and I hope I continue to improve! I'm learning a lot and want to keep learning and applying that knowledge every day! 


Thank you so much to everyone who has supported and helped me on this journey. I'm truly thankful for all of the help I've gotten and all of the support I've gotten, too! Thanks so much for taking the time to look at my stuff; it means the world to me. I'm thankful for you! 


I hope you enjoyed looking at my stuff this week! Looking forward to working even harder on some other upcoming projects! 


Friday, February 3, 2023

Lighting Assignment IV- Wait, Who Turned Out All The Lights?

 Hey, how's everybody been?

I've been just peachy over here-- doing my best to solidify my understanding of animation and MOCAP. 

I've got lots of stuff I want to show, but I need some time to compose a reel. I've been moving at 100 mph over here- with no signs of slowing down!

So this week's assignment was interesting! Well, they all usually are, but you get my point!

We got three separate lighting challenges issued to us, which I will briefly reproduce below:

  1. Create a scene where 80% of the world is in darkness and only 20% is lit. Use shadows to your advantage!
  2. Create a scene that plays around with different colored lights to elicit different moods.
  3. Create a scene that looks different at different types of day. Establish mood, while you're at it!
I went ahead and attempted these three challenges on my own. I'm not going to tell you what's what, either. 

Instead, guess which image I was pinning on which challenge. That'll tell me how well I did! 

Anywho, let's get right into it!


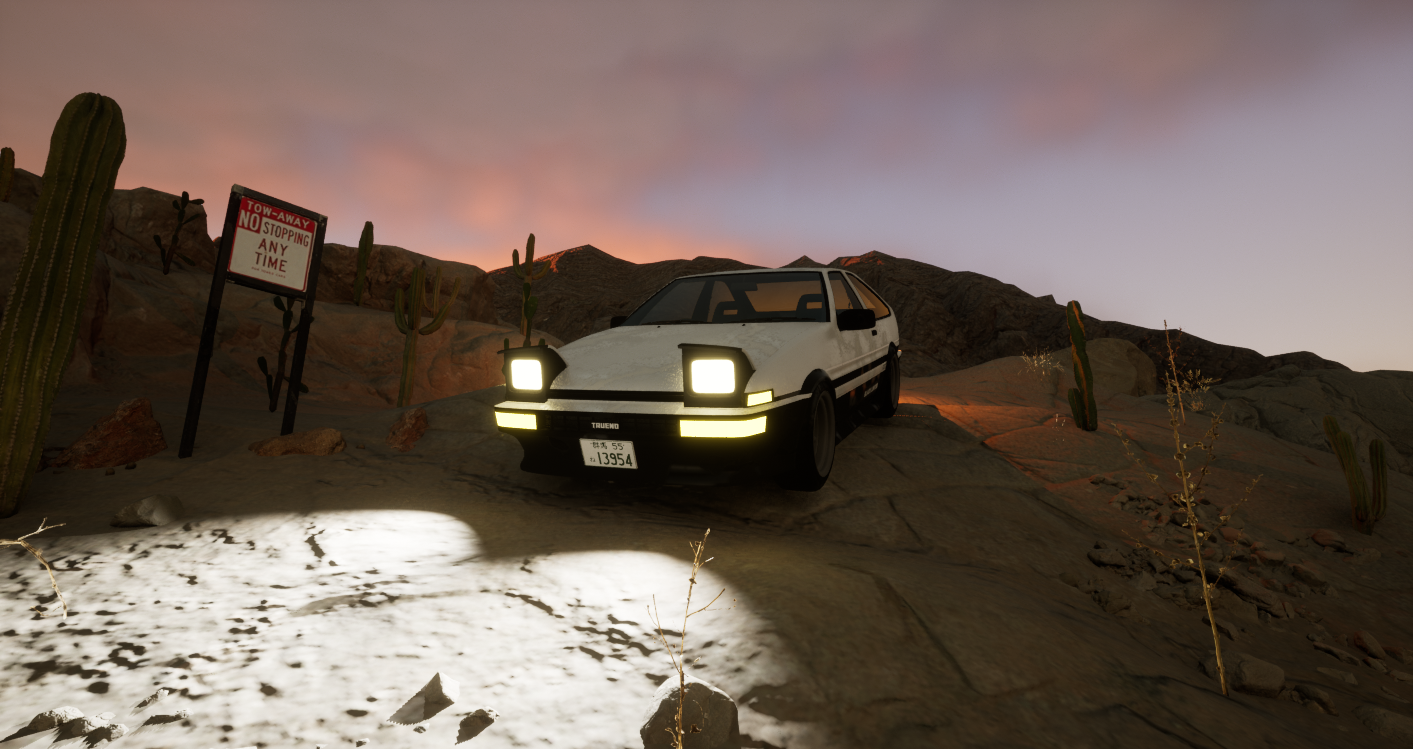
So, since we needed to utilize Megascans and asset packs for this assignment, I thought it would be great to utilize some desert scenes. 


After all, the Southwest is my favorite place on planet Earth, so I decided to start close to the heart!


Secondly, I decided to utilize an iconic car, the AE86, in this picture. This is quite an old car and would be interesting to see in a desert scene, which is why I slapped it in. 


So, my scenario was born from this silly thought. I'll go into some details so you can get a good idea of why I staged my scene the way I did. 


When I lived in New Mexico, there was this hiking trail that I loved going to, but my little hatchback had a struggle getting up to the path. 

The path was filled with potholes and steep inclines. And, since my car lacked four-wheel drive, I obviously was up to the challenge. 


I thought it would be funny if I took that fun experience and poked fun at it. I made a steep incline and slapped a "NO PARKING OR STOPPING" sign there. Because, who in their right mind would stop on the side of a mountain?

To dress the scene up, I placed some succulent plants and some abandoned equipment and barrels. Really makes you wonder who dumped all the stuff and why. 


I played around with different days, different lighting, and a few shadows here and there. And although there are definitely some things I could've done better, 


Between Capstone, GameLab, eating, sleeping, and working out, I have been really pressed for time. But I'm thankful I was able to spend many, many hours working on lighting this week. 


And I'm even more thankful that Unreal did not crash or corrupt this time! This was definitely a huge blessing; I didn't have to finish my project all in one go or open it to the shock and horror of it being corrupted or gone. 


So yeppity yeppity YEP! That was my crazy Friday workday, everyone! I hope the result looks nice and I hope you were able to figure out which pictures utilized which challenge.


As always, I'm looking forward to critique and learning even more about lighting!

Thanks a bunch for stopping by and making my day!

Now, I'm off to bed! Yay! 


Friday, January 27, 2023

Lighting Exercise III- Maverick!

 Goodness Gracious, Great Balls of Fire!

Hey everyone!

I'm back with a new common art post! 

And what a week it has been. Soon, I'll have some animations and poses to share with you all, but for now, I'm still working on them. 

Right at this moment, however, I do have some exciting news! I've been hard at work on this week's lighting module and I'm super-stoked to share it with you all! 

I have a lot of images this week, so expect a good bit of writing regarding my process. Without further ado, let's get right into it!

So, if you have walked by my desk at all when I'm around, you might be able to guess that I'm a huge fan of Top Gun. Like, I love all things military aviation and 80s synth music, so the movie is a match made in heaven for me. So, it only felt appropriate to delve into the world of Top Gun for this lighting assignment.


I have a lot of wallpapers and reference images of F-14s taking off from aircraft carriers, and since that was primarily where they were flown in the Navy, it only made sense to include an aircraft carrier in this week's scene. Little did I know (or maybe I did know and I'm just crazy) that an aircraft carrier has so many different little parts. 


So, so many parts, in fact, that I took the better part of a half-day to assign all of the nodes and give all of my materials texture, metallic properties, and roughness. All in all, my scene contains 50+ materials, each with their own roughness and metallic properties.

Don't believe me? I have some close up shots and some blueprint screengrabs to prove it!

Like this.


And this.

And this.

Anddddddd this.

And. This.

And.

This.

And.

.


.


.


This!


Yep.

I have plenty more to share with you, and I'll pepper them into the paragraphs, like I do below. 

But you get the point. 

If the definition of insanity is doing the same thing over and over again and expecting different results, then I'm not sure what messing around with textures in Unreal grants me. But hey, I made some cool stuff out of it!

And that's what matters! 

I know the requirement was only to take a screenshot of one material blueprint, but I was experimenting with so many different effects I only found it appropriate to document a lot of them. 

For example, some of the textures, I added. Others, I multiplied. Some I multiply/added. Others, I used a Cheap Contrast. Others I used constants and 1-x. It really varied on what look I was going for. 


And I think it lent itself to some really cool effects. It just took a reaaaaaaally long time to get all of the textures. Finding open-source, non-watermarked textures is a lost art nowadays. All in all, I have 4 folders worth of metal, rust, roughness, and grunge textures to use on my next projects. 

Woohoo!!!

I was lucky enough to be able to add roughness to the F-14s, too. I used both gear up and gear down variants, so that the scene would have a more realistic look. I wanted to add people, but I had already spent a ton of time on this project, so I figured I would be good with the ghost town effect.

As for the lighting, my initial reference image for this project was one of my aforementioned wallpapers of an F-14 on an aircraft carrier. 

The picture does have a fire effect, but I will have to learn Niagara at some other time. I have a lot of other projects to work on at the moment, but that is definitely on my radar. If I add fire, you will be the first to know! 

As for the lighting, this week's workshop was ultra-informative for that part of the project! I had a much easier time, since I knew what the checkboxes and tabs did when I was messing with them. 

That also helped me to realize that I was my own worst enemy on my second lighting project. I created some kind of impossible depth of field, so I ended up corrupting my file. Hence why my lighting assignment that week looked so rushed. I did it in about an hour. It's my fault for trying to input an eleventh hour change! 

As for the depth of field and lighting on this assignment, I'm much happier with my results. Since last week's project, I've been saving a lot more HDRI images, so I had plenty to tab through while I was picking the lighting. I also messed with the Rayleigh and Miep effects, which gave the world a sunset look that it didn't have prior.

This assignment has shown me just how customizable Unreal is. You can really deviate from the normal lighting and create your own, manual lighting. You just can't be afraid of the software! 

For months, I have been afraid of the software, as I have never worked in 3D before. But, after experiencing a worst-case scenario on last week's project, I can safely say that I'm not afraid anymore.

Am I still going to make mistakes? Sure! 

Am I still going to get confused when I get error codes? You bet!

But am I happier with my creative process? Heck yeah!

I just gotta keep working on stuff and my mistakes will help me to learn! They're not mistakes, they're happy accidents! And soon, they'll really help me to solidify my process.

So, closing thoughts, closing thoughts.

I'm thankful we had this assignment, as I got more in-depth with Unreal. I want to use these techniques on my own projects in the future, hence why I'm attempting to document the heck out of this project.

Also, this assignment seemed like a crazy scope at first, with 50+ materials and a huge aircraft carrier, but as I got into the workflow, it got much easier! Once I figured out what nodes did what, I could generate particular effects without much thought. All it takes is a little bit of elbow grease and some Unreal Engine crashes to get there.

Oh! Another thing! Save often! And don't just save your Level. Save the whole project. Made that mistake while doing some stuff in class yesterday. I lost everything I had worked 3 hours on. But, like the Beatles song says, Life Goes On! 

Another thing! I will keep trying with new nodes and materials. The tech artist in me really loves playing around with blueprints. They are so much fun. Even when I don't know what I'm doing, there is always such good documentation on them and for that, I'm eternally grateful! 

So yep! That is my post! I hope you enjoyed Fightertown, USA! 


Thanks for stopping by!