Here is my final industry review! Not much to say about this at the moment.

Showing posts with label common. Show all posts
Showing posts with label common. Show all posts
Thursday, August 3, 2023

Monday, July 31, 2023
Final Delivery - The Animated Athlete
Hey everyone!
I have a lot going on (as does everyone in our cohort), so I'm going to keep this blog post short!
After toiling away with the graph editor for several long weeks, I have a product I am finally happy with.
Take a gander at the final iteration of the Animated Athlete project!!
Again, a lot of the work was on the back end, with the graph editor, so I was messing around with tangents, snapping keyframes, and the whole nine yards.
In addition, I also got wonderful feedback from my professors and fellow animation students, which is always a treat.
So, yeah!
Before I go, I would like to drop the final presentation link here, so you can view it. It has a bunch of stuff compiled from the previous iterations, which makes for interesting comparison material.
Animated Athlete - Final Sprint Presentation
Well, I hope you enjoy what I did! See you at Industry Review.
Wednesday, July 5, 2023
The Animated Athlete - Part IV!
Hey everyone!
This week has been an exciting one here at FIEA! Not only did we have a Capstone Status Update last week, but we also all made some incredible progress on our Common Art projects! (party noises)
I have worked really hard over the past two weeks with the hopes I would have something cool to show you all this week. Hopefully, this counts for something, right?
So this week, I added a lot to the project, with direction from my animation teachers, Cheryl and Jonathan. I was working really hard to make the animation loop and trying to fix the issues I was having with the legs over-extending.
As I figured out with the arms last week, there is this setting called "Body Space" and "Stretch" on the various appendages on Ray. This gives him a cartoonier look, which can be appealing in some instances. In this instance, however, it was not appealing at all. His arms and legs looked like they broke, which made the animation much scarier than it probably should have been.

During animation class, Jonathan and Cheryl helped me to troubleshoot this issue, which could be turned to "0" in the channel box, preventing Ray's bones from breaking. Unfortunately, I was not able to fix the leg entirely, but it doesn't "pop" as much as it did in the previous iteration. I'm going to go back to the drawing board in animation class and ensure that I have the proper protocol down for troubleshooting this issue.

So, now Ray's knees do this weird floaty thing, which is my bootleg solution for reducing the pop. Since I didn't entirely solve the issue of the popping knee, I figured a way to temporarily cheat the issue would be to key and copy the pose I did want until the leg moved. Unfortunately, since the character is bound and constrained to a ball, he moves ever-so-slightly and his feet twitch back and forth. This is most noticeable on his right foot.

I did, however, make the animation look much better than it did last week by putting the feet flat on the ground. Previously, he had been putting all of his weight on his arms and the ball, with his feet erratically kicking to and fro, even if the ball was not anywhere near him. It honestly looked like one of those animatronics at Disney, which was really creepy and led me to just plant them. While they do still slide, Jonathan did show me how to do that in a help file. I'm going to reference his help file and learn how to do the process on my own, so I can figure out this issue in future projects.
So yeah! My ball and character now properly loop. The animation loop point is a bit rough around the edges, but it is ultimately much smoother than where I was last week. Last week, the ball zipped around like a UFO from the last place he kicked it to frame 1 of the animation. Now, it rolls down his leg, bounces up, and arcs into the first pose.

As per Jonathan's suggestions, I also made the second soccer ball (the one he kicks on the ground) interact with a rock and roll back to the player. I need to make the motion slower, but now it doesn't look like Ray is playing with an imaginary friend or ghost. That would be scary and I'm happy that now there is a small environmental object for him to interact with.
But yeah!
While this week was very crazy both in and outside of FIEA, I'm happy that I got to make some time to animate my Animated Athlete! I'm excited to showcase what I've done to the class and get more feedback moving forward.

I think Ray's soccer moves are great and I am so happy that the Animated Athlete is shaping up to be a nice addition to my portfolio.
For reference, here is what the project looks like now:
And here's what it looked like last Sprint:
They grow up so fast, don't they?
So, now instead of being 81 frames, this animation is around 100 and it loops relatively seamlessly. I just have to work on making the motion more natural, but I am thankful, at least, that it is much easier.
Jonathan did suggest utilizing the Ultimate Ball Rig in place of this Maya Ball Rig I'm using, which I might do in the future. For now, too much depends on this ball rig for me to change it at the moment. I do agree that the other rig is easier, but I've already dug my grave with this. It's a definite stretch goal, though, and I will keep it in mind-- which is why I'm bringing it up here!
As always, thanks for looking! Excited to see what everyone else has made this week!
See you soon!
Wednesday, May 24, 2023
The Animated Athlete... My Common Art Project!
Hey everyone-- it's been a long time since I've updated this blog. I've honestly just been working on a lot of stuff in the background, without a lot of time to write about things.
Well, that all changes today! I'm going to be covering my most recent Common Art project-- an animated athlete!
You can see him below, juggling the soccer ball like it's going out of style!
And here is an alternative angle.
The inspiration for this project stems from my love for soccer. My family is big into soccer-- so I have a lot of fond memories of trying to juggle soccer balls with my brother and dad.
That gave me a great idea for an animation-- I wanted to capture the fun fluidity of juggling in my demo reel. For a week or so, I was looking into different types of animations to include on my demo reel. I wanted the animation to be exciting and engaging for viewers.
To see more of my inspiration and initial ideas for the project, check out the PureRef board below.

Overall, I wanted my animation to touch on a subject matter that usually isn't seen on demo reels. I know there are lots of bouncing ball and push/pull animations usually on reels and I wanted to stay away from those. I wanted to use a unique subject matter, so I could try something new.
The below gif really stood out to me, as the soccer player was balancing on a ball, while juggling a ball and kicking another ball. I thought it was a really interesting idea for an animation, so I wanted to give it a shot!

I worked really hard to storyboard the animation in 3D, which I did by using stepped tangents and keying each time the soccer player did a key pose. Since he did move around a lot, I definitely have more than 20 keyframes, which is a lot for a 47 frame animation. Overall, this animation is just under 2 seconds long, but there is a lot of dynamic motion in it. And yes, I did use a frame exporter to export the GIF frames, which is why I know the exact amount.
Also, as a heads up, I'm going to be showing my playblast progress between some of the below paragraphs, so you can see all the work I did as the animation progressed!
My biggest struggle in animation is timing, which I hope the project will help me learn. Already, I'm learning just how fast objects move with the impact of gravity. In addition, the character has a lot of weight, which he places largely on the ground (with his hands) and on the ball he's sitting on. The ball that he's sitting on has some squashing going on, which I hope displays the character's weight effectively.
A big setback with this animation was believe it or not the rig. I had originally intended to use the Dirk the Daring rig on Agora Community, however, it required a MEL script, which I didn't know how to run. I decided to use the Ray rig by CGTarian instead, as he was similar in build to the soccer player in the GIF. He also did not have big hair, excessive clothing, or big hands/feet. The character needed to have human proportions, which Ray achieved perfectly.
I initially had trouble working with Ray due to a camera issue, which Nassir was kind enough to help me with! So, thank you so much Nassir- you went above and beyond in helping me. Thank you so much for your awesome explanations- I appreciate it!
After the rig was all figured out, it was just up to how much animation I could power through. I wanted to use this storyboarding period to see how much I could schedule myself to do in the future, so I could get a good idea of how much work I could give myself moving forward.
Overall, I ended up spending about 7 hours working on the blocking out of the animation. I spent around 4-5 hours planning the project in Jira and 2 hours getting references. 2 hours were spent selecting rigs and around 30 minutes were spent testing and setting up the scene.
In the future, I see myself spending around 10 hours or more per week on this project. Based on feedback from my peers, I can increase or decrease this number.
Since this is my own project, assume that all tasks are assigned to myself. I will add more sub-tasks as the project dictates, depending on any re-routes or unplanned hiccups I might encounter. Below is the most detailed schedule I could come up with. I go over additional details in my PowerPoint presentation, which will be shown to the class on May 25, 2023.

Alright, speaking of planning, this project has forced me to learn Jira. I'm actually using Jira to archive and upload my Playblasts and videos, which is great for if I need to re-reference old work. I'm trying to get into the habit of updating descriptions or adding comments to show what work I've finished and when.
But most of all, Jira is great for planning sprints! I want to figure out how to track my time through Jira, so I can get an even better idea of what I've accomplished and how long it's taken me.
Thanks to Jira, I was able to plan out the entirety of the project, from this first sprint until the end. While it took awhile, I think this will be useful in keeping me focused.
So, yeah! I am going to keep working with Jira and continue iterating on the animation . Since this is a highly-focused animation (and since it's only about 2 seconds long), expect lots of little updates, such as me working on the feet or focusing on the face and eyes. I did not do any facial animation this week, so expect some facial expressions and changes in the next few weeks.
This project leaves a lot of different areas for improvement and exploration, all of which I am excited to explore, so I hope you enjoy coming along for the ride as much as I enjoy taking this wild ride. Thanks again for taking the time to read my post and take a look at some of my progress.
See you soon!
Monday, April 24, 2023
Figure Drawing
Here are some of my personal figure drawings from this semester:


Some of these are physical, some are done in Procreate on the iPad. I will update this page with more of my work, but I do not have access to my class sketchbook at the moment, as I am out of town as of writing this.
Monday, April 10, 2023
Artist Statement
Nature is something I have always
admired, something that always helped keep my work rooted. My role as an artist
is to capture the nature of the world, the ebbs and flows of living creatures,
and present it in an animated format. Animation is my medium of choice, since
it allows me to entangle myself in nature, teaching myself how to make birds
fly and wolves howl. Being an animator gives me the tools and tricks I need to
help recreate our incredible world on a 1920 x 1080p screen.
My primary role as an animator is
to capture the magic and mysticism of our world, showing modern audiences just
how incredible it really is. I want viewers to feel the chill of a windy day or
the slick wet of monsoon season when they step into my animated worlds.
While a lot of modern art and
animation focuses on human elements, I enjoy focusing on the inhuman. There is
magic in making something move, especially if that something is not usually
portrayed in modern work. This is why I tend to focus on animal fantasy and
natural elements in my work, as I want my audience to be captivated by the
nature I am portraying.
Ultimately, I don't know what my
audience is going to come away from my work thinking-- and that's the beauty of
it! Like nature, I hope my work is able to impact people around the world,
regardless of background or creed. I want the animations I create to bring
people the child-like joy I experience when finding a waterfall at the end of a
mountain trail or a never-before-seen mountain vista. My greatest joy would be
to reconnect someone with the natural world through my animated work, providing
them with the tools they need to answer their own call of the wild.
Friday, February 3, 2023
Lighting Assignment IV- Wait, Who Turned Out All The Lights?
Hey, how's everybody been?

I've been just peachy over here-- doing my best to solidify my understanding of animation and MOCAP.

I've got lots of stuff I want to show, but I need some time to compose a reel. I've been moving at 100 mph over here- with no signs of slowing down!

So this week's assignment was interesting! Well, they all usually are, but you get my point!

We got three separate lighting challenges issued to us, which I will briefly reproduce below:
- Create a scene where 80% of the world is in darkness and only 20% is lit. Use shadows to your advantage!
- Create a scene that plays around with different colored lights to elicit different moods.
- Create a scene that looks different at different types of day. Establish mood, while you're at it!


Instead, guess which image I was pinning on which challenge. That'll tell me how well I did!

Anywho, let's get right into it!

So, since we needed to utilize Megascans and asset packs for this assignment, I thought it would be great to utilize some desert scenes.

After all, the Southwest is my favorite place on planet Earth, so I decided to start close to the heart!

Secondly, I decided to utilize an iconic car, the AE86, in this picture. This is quite an old car and would be interesting to see in a desert scene, which is why I slapped it in.

So, my scenario was born from this silly thought. I'll go into some details so you can get a good idea of why I staged my scene the way I did.

When I lived in New Mexico, there was this hiking trail that I loved going to, but my little hatchback had a struggle getting up to the path.

The path was filled with potholes and steep inclines. And, since my car lacked four-wheel drive, I obviously was up to the challenge.
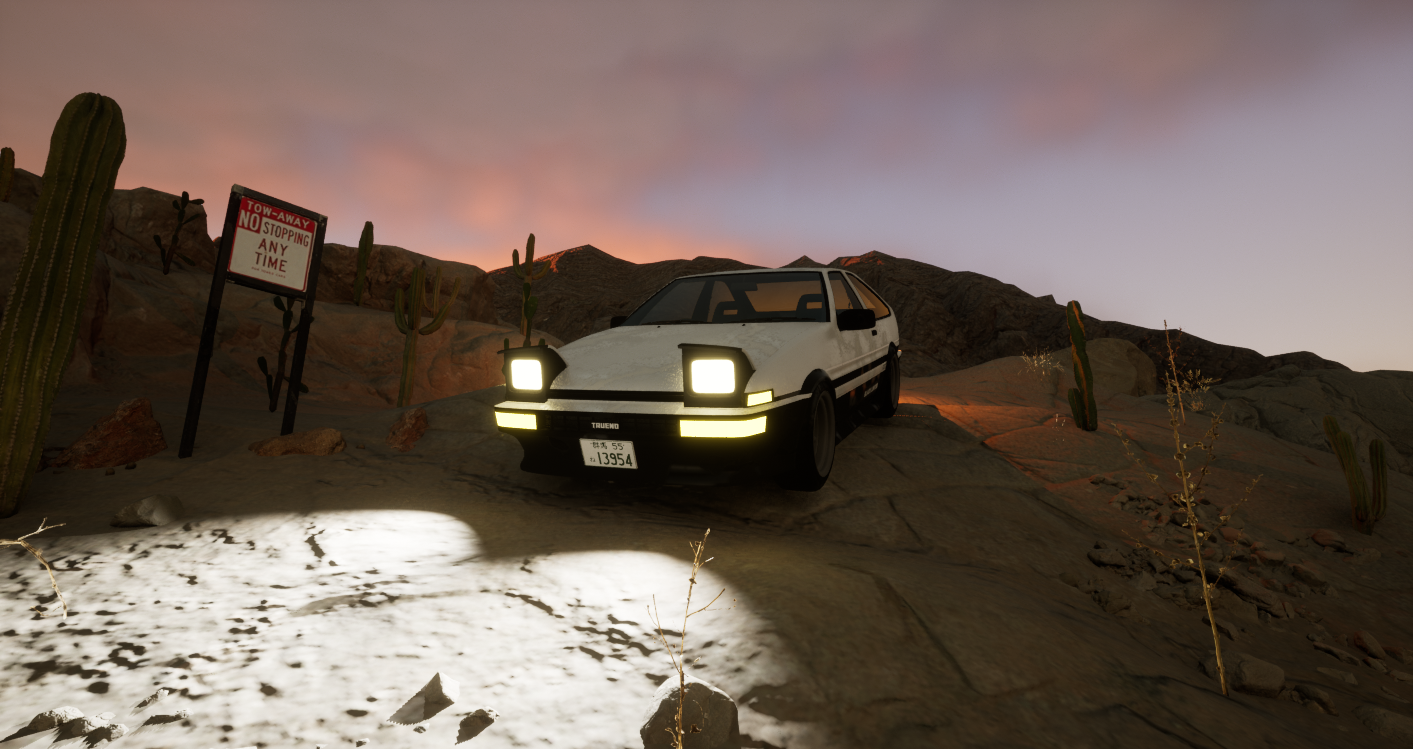
I thought it would be funny if I took that fun experience and poked fun at it. I made a steep incline and slapped a "NO PARKING OR STOPPING" sign there. Because, who in their right mind would stop on the side of a mountain?

To dress the scene up, I placed some succulent plants and some abandoned equipment and barrels. Really makes you wonder who dumped all the stuff and why.

I played around with different days, different lighting, and a few shadows here and there. And although there are definitely some things I could've done better,

Between Capstone, GameLab, eating, sleeping, and working out, I have been really pressed for time. But I'm thankful I was able to spend many, many hours working on lighting this week.

And I'm even more thankful that Unreal did not crash or corrupt this time! This was definitely a huge blessing; I didn't have to finish my project all in one go or open it to the shock and horror of it being corrupted or gone.

So yeppity yeppity YEP! That was my crazy Friday workday, everyone! I hope the result looks nice and I hope you were able to figure out which pictures utilized which challenge.

As always, I'm looking forward to critique and learning even more about lighting!
Thanks a bunch for stopping by and making my day!
Now, I'm off to bed! Yay!
Thanks a bunch for stopping by and making my day!
Now, I'm off to bed! Yay!

Friday, January 20, 2023
Lighting Exercise II - Electric Boogaloo
Hey everyone!

Wow has it been a rough week! But I'm still kickin' and bringing down the house with these Lighting Exercises! Keep 'em coming!

This assignment was kind of a doozy, because my original file corrupted! I couldn't figure out how to get the depth of field working and I was anxious to try to add it. After following UE5 documentation, I thought I had my answer... Then, I clicked a slider and my project crashed!
I restarted the project and to my horror, everything in my scene was gone. Not only that, I couldn't save my project, as an asset had corrupted during the crash. Needless to say, I was not too happy to be recreating the scene again in the eleventh hour.

So, to preface, I didn't figure out the depth of field. I just wanted to upload this on time, so here I am. I really wanted to learn how to do it, as I think it creates a cool effect. But, I really couldn't figure it out and could not risk not turning this in with only an hour left to go.

But, yep. This assignment was certainly an assignment for me. This was actually a struggle to complete because of the technological pitfalls, yes, but also my own confusion surrounding UE5 in general. I don't understand anything that has to do with the camera actor. And despite being a photographer, I really struggled to get the effects I wanted in this project.

Nonetheless, I just wanted to turn something in, regardless of my own pitfalls with my work. I am happy with the HDRI I chose and I like the moody lighting and volumetric fog I added. I had fun playing with bokeh, but didn't think it was worth including in the assignment, as it confused my lighting and made the metallic pattern on the sphere quite chaotic.

But, it was fun clicking through all the menus and checkboxes and seeing what everything did. Am I a lighting expert yet? By no means! But did I learn something? Yes!
I will continue to keep you all updated about my artistic journey! I'm just tired and need to hit the hay, so this was a relatively short post.

Thanks again for checking out my stuff!
Zzzzzz!
Also, before I go-- check out my setup!

Pretty cool right? Now it's officially, for really reals, time to catch some Zs.
Zzzzzzzzzzzzzzz!
Friday, January 13, 2023
Lighting Workshop! Illuminating a New Realm of Maya-- Arnold!
Hello World!
It's been a long time.... How have you been?
I've been up to a lot of crazy-busy stuff in the past month. It's honestly been such a whirlwind. But I'm excited to share some new updates with you. Woohoo!!
Without further ado, let's get into it!
So this week marked our first week back at FIEA and what a week it was! We got probably one of my favorite Common Art assignments (and workshops!) ever this week-- a lighting project! While I still have a lot to learn, I am so stoked about this assignment.

Now, it wasn't easy to hit the ground running on this one, as I initially had some problems with the 3D model I chose. Now, for the curious, yes, I used the models at ThreeDScans. You can check them out at the link just before this sentence! These models are particularly great for practicing lighting because they are clay and wood models, meaning that they do not have complicated textures that make it difficult to see what you're doing.
Unfortunately, though, the first model I picked was not scaled or oriented right. It was flipped over on the Z-Axis and it was seriously way too big. Like it was so big that I couldn't figure out how to focus the camera on it! So I ditched it and decided to work with our friend, the Goat!

I was still having trouble, though. So, I had to get by with a little help from my friends.... Big shoutout to Aimee for helping me figure out the Area Light and Exposure thing. I was seriously stuck and she gave me some awesome tips. Thanks, Aimee! You rock!
Alright, so... You probably want to go ahead and see more of my model, huh?
So, let's get right into it! Also, check out this sick transparent PNG I accidentally saved! Let me know if you like this one better than the one above!

I'm going to start off with the RGB pass. This pass was supposed to give viewers and the artist an idea of how intense the lighting and shadows were. It also was intended to make it easy for me to adjust things and render.
And it really was the best way to start off. Knowing how much I needed to tweak everything really saved me a lot of heartache. Speaking of heartache! Look at the below image. This was my very first pass. Or, you could say, Baby's First Lighting Pass. I'm glad I made some changes to it in the above three images!

So, I took the shots from multiple angles, just to show you where the lights and shadows are really doing their work. I know that it's not a perfect job, but I'm pretty happy with this for my first attempt at lighting. In future Challenges like this, I want to experiment with moody colors or palettes, like Tom discussed in our workshop.
Anywho! Let's break right into the full-color pass now!

So, for this one, I gave it kind of a warm tint with moody shadows. To do this, I adjusted the temperature and settled with the option I liked the best. It was a really good time and it was nowhere near as stressful as the RGB pass because I had already tweaked things in that rendition. So, I was thankful that the RGB pass made it easy to see mistakes and make adjustments. Hooray for progress!

Much like the previous attempt, I took multiple different shots from multiple angles. I really wanted you to see where these lights fell and what I was attempting with the model.
All in all, I know it isn't perfect, but I'm so excited to finally tackle lighting. I was always so confused about how to render and (not going to lie) Arnold always scared the pants off of me.
But, now that I have practice in it, I honestly would love to render more in this. It does the model much more justice than the default Maya render. And, it's also much easier to save an image file directly in Arnold instead of taking a screenshot and hoping it's 1920 x 1080 p. Not that I've done that before or anything!
But yeah!

Thanks for looking at my stuff. And, Tom, if you are reading this-- Thank YOU! I appreciate your time, your workshop, and your awesome advice. Let me know what I need to work on so I can make it even better for the next assignment!
Have a great long weekend and enjoy the chilly weather!
See you on the Flip Side!

Subscribe to:
Posts (Atom)